curryuku:foervraengd:elliotoille:felt like doing a tutorial thingy (what should I call these??
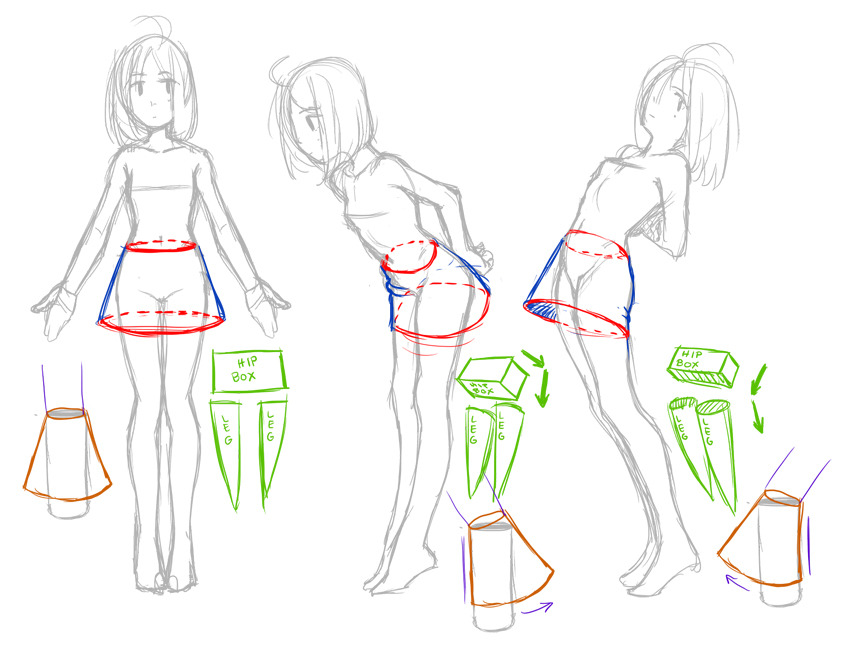
curryuku: foervraengd: elliotoille: felt like doing a tutorial thingy (what should I call these??) again! I think I’ll make a tag for these in case I do more. This time I’m gonna talk a little about how angles affect how clothing falls aaaand stuff. here we go… Given: The first drawing of these three is how the clothing naturally wants to fall, how it is made to be shaped. Or, whichever pose you could take that will give the garment the least amount of creases. I’ll actually talk about the green first; this is a representation of the hip box, which itself is a representation/simplification of your whole pelvis area. You see how your legs and hip box oppose angles here. in almost all poses except standing straight, your hip box and legs will create a bent angle, which affects how clothes fall. The red/blue is the skirt (obvs), the red specifically is the ellipses of the top and bottom openings of the skirt. This skirt is very stiff material for the sake of this example, so notice how the two ellipses always match eachother. the top ellipse is where the skirt is actually attached to the body, so it’s the boss; the bottom ellipse will more or less do exactly what the top one does. here’s where the fact that the legs and hip box are at different angles becomes important. The top of the skirt is attached to the hip box, but the bottom ellipse is in the realm of the legs. The orange lampshade shape diagram there is a simplification of this. It is very much like if you were to tilt a lampshade. The side you are bending towards will hug the body and create creases. The side you are bending away from will fall off the body in a straight line. It even works with pants, though as the bottom ellipse(s) gets farther away from the top there’s more room for the garment to get distorted by gravity, perspective, and bent knees and such. But with this last example you can really see how the side touching the legs really hugs the body underneath, whereas the other side hangs off of it in a straighter, crease-less line. Dresses are a little different because their top ellipse is attached to your torso/ribcage mass rather than the hip box. Much of the time you get the same result as with a skirt. However if the hip box and ribcage mass are opposed sideways rather than forward or backward, it becomes a little tougher: You can see in the third drawing how a shirt and a skirt together would fall in opposite ways if your body is bent sideways. If the shirt is long, just like I mentioned above about the long pants, there is more distortion of this effect. I’ll take what I said above, “The side you are bending away from will fall off the body in a straight line”, and add a bit to the end: “… until it hits something.” In the fourth drawing above, the garment is falling off the body in a straight line on the right side. If you lengthen the garment: The straight side continues down as normal until it hits the leg and becomes the body-hugging side. in response to that, the body-hugging side from farther up becomes the straight side when it falls off the hip. Aaand with that I think I’ll stop lol. I hope that wasn’t hard to understand. It’s easy to do yourself, just wear a skirt or some loose pajama pants and take hula poses in the mirror lol. For all of you who have been longing for ME to make a tutorial about clothes, I truly recommend you to read this post. Since it covers the area in clothing that many other tutorials never mention, clothing is more than just “drawing folds and wrinkles”, it’s about knowing how the design and the behavior of our bodies affect it. So yeah. Read this. Please. It’s so easy explained. rebloging for future reffs -- source link
