emmastudies: Microsoft OneNote tutorial for study, class and lecture by emmastudies Hello! I have ha
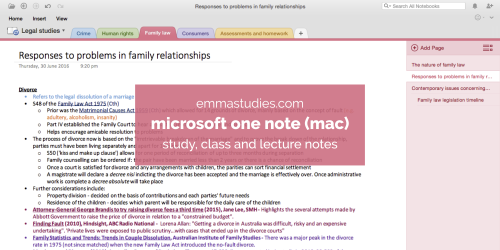
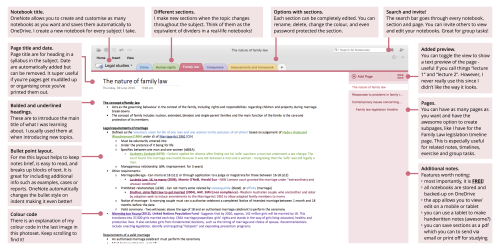
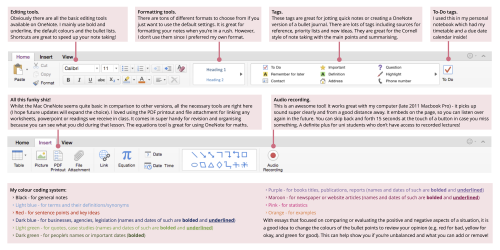
emmastudies: Microsoft OneNote tutorial for study, class and lecture by emmastudies Hello! I have had numerous people message me about how I structure my notes for OneNote so I thought I would put together a tutorial! Above is a small run down of the program and my little two cents on each feature. But now I’m going to go into a little more detail to help anyone who is looking for somewhere to type their notes. Through I’ll suggest my ideas on how to use OneNote for different reasons including study notes, class notes and lecture/tutorial notes. Set up and use: Start by downloading OneNote from the App Store or from their website if you’re using a PC. It is free!!! I would definitely recommend downloading the mobile or tablet app as well. Sign in with an Outlook account and begin making your notebooks. For high school I would suggest a new notebook for each class. For university, I had one notebook for the entire semester. As I go into my second semester I’ll make a new one, and so one. For study notes, it is up to you. You could either make one notebook for all your study notes and use sections to divide per subject or make a new notebook for each subject again. Or simply and a new section in the existing notebook. Notebooks are linked to OneDrive meaning you can close the notebook and reopen it at any time. They’re automatically saved too, so you can edit on your phone and when you use your computer it is updated! Start creating sections. These act as dividers so depending how you have structured your notebook, make them for either each topic of your subject (high school) or each of your classes/subjects (university). For my high school class/study notes I made a new section for each new topic and for university I have one per subject. As you can see in the photoset; my notebook was legal studies (subject) and each section was for a topic (crime, human rights, family, consumers, assessments and homework). Create your pages for each time you have class. Add the title of what you’re doing and start typing your notes. For my lectures I usually just name them “lecture 1”, “lecture 2” because I’m lazy, however for study notes I would use each subheading of the topic in the syllabus. If you’re wanting to understand my headings and subheadings completely I suggest checking out the legal studies syllabus that I created the above notes too (you can see it here on page 26). Time for decoration and colour coding. Usually as I’m typing I bold or underline and colour code but you can always go back and do it as a revision method. This also gives you a chance to add any extra information you find! You can see an explanation of my colour code in the final image of the photoset. I found colour coding and formatting super helpful when I was studying for my HSC final exams! Printing time! When I had finished my study notes (or class notes) I would print them so I had a physical copy to highlight and annotate. Here is where it gets a little fiddly. To print on one A4 size piece of paper without cutting off half your text, you need to shrink the size of the text box. This is what you might see - with half the text cut off. I would say reduce it to about half the original size - you can usually see on print preview how close it is to the edge. After you have made the textbox thinner, it should look like this. Another tip is printing using one sheet for two or more pages. This helps to reduce the amount of paper you’re using. On the print settings look for “pages per sheet” and change it to the number of pages you want (obviously the more pages, the smaller the font). It should look something like this (I’m not 100% sure if every computer or printer has this option, but for reference I use an Epson printer). That is pretty much it for how I use OneNote for my all my different types of notes! It is very simple once you’ve organised everything! I would 100% recommend this program. We were advised to use it in year 9 when we received laptops from the government and I’ve not stopped using it. Althought there are some different between the Mac and PC versions, the main elements are the same. However you can check out this post by @vanesastudies which is for the PC version. I hope this tutorial was helpful. If there is anything I’ve missed out, drop me an ask. Thank you for reading! x -- source link


