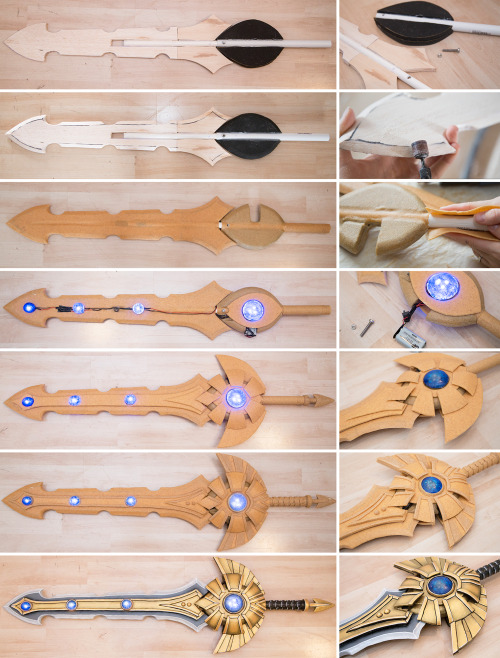
Dani Moonstar’s Sword in progress, designend by the amazing Zach Fischer Comics & Illustra
Dani Moonstar’s Sword in progress, designend by the amazing Zach Fischer Comics & Illustration! As promised, here a complete step my step mini tutorial of the sword I’ve finished only yesterday! The construction cost me around 20 hours plus 8 hours for painting.The base was a combination of two pvc pipes (different thicknesses, which can be easily slided together), balsa wood and EVA foam. Balsa wood and EVA foam are very lightweight and easy to carve with a dremel, so they are some of my favorite materials for a prop base. Since they are pretty breakable however, it was necessary to cover them with Worbla to make them more durable and solid. Also the whole sword can be separated in two pieces so it’s easier to transport it. To connect both pieces I’ve just made hole throw both pvc pieces and fixed them then with a screw. I also wanted to light up my gemstones, so I’ve left some space for a 9V battery in the bottom part and then connected 12 3V LEDs with a simple circuit (three LEDs in serial, connected then in 4 group parallel). You’ll find a tutorial for the LED gemstones here: http://www.youtube.com/watch?v=pszN08KCNUcThen the whole circuit is connected with some tiny plugs between top and bottom. So hide the battery, screw and cables I also added some detachable pieces which are fixed with velcro to the sword. Not the best solution and I guess I’ll replace the velcro with magnets later. At the end the sword was primed with around 6 layers of wood glue and then painted with acrylics by hand. And yeah, that’s pretty much all! Hope this help you with your own projects!Wanna read more tutorials? Check out my page: http://kamuicosplay.storenvy.com/Or read my cosplay making books: http://kamuicosplay.storenvy.com/ -- source link
#dani moonstar#cosplay props#cosplay#worbla#tutorial#marvel

